
Fix Windows Could Not Complete The Installation [SOLVED]
Fix Windows Could Not Complete The Installation. To Install Windows On This Computer, Restart The Installation: If you are facing this error then it means you are using Audit Mode to install Windows which is the main cause of this error. When Windows boots for the very first time then either it can boot to Windows Welcome Mode or Audit Mode.

What is Audit Mode?
Audit Mode is a network-enabled environment where a user can add customizations to Windows images. Whenever Windows starts it shows you a Welcome screen immediately after installation, however one can skip this Welcome screen and boot directly to audit mode instead. In short Audit Mode allows you to boot directly to Desktop after Windows installation.
Windows could not complete the installation. To install Windows on
this computer, restart the installation.
Also, the main issue in this error is that you’re stuck in a Reboot loop and that’s why it’s more annoying. Now you know about Audit Mode and Welcome Mode it’s time how to fix this error, so without wasting any time let’s see how to Install Windows when in Audit Mode.
[SOLVED] Windows Could Not Complete The Installation
Method 1: Run Automatic Repair
1. Insert the Windows 10 bootable installation DVD and restart your PC.
2. When prompted to Press any key to boot from CD or DVD, press any key to continue.

3. Select your language preferences, and click Next. Click Repair your computer in the bottom-left.

4. On choose an option screen, click Troubleshoot.

5. On Troubleshoot screen, click Advanced option.

6. On the Advanced options screen, click Automatic Repair or Startup Repair.

7. Wait till the Windows Automatic/Startup Repairs complete.
8. Restart and you have successfully Fix Windows Could Not Complete The Installation Error.
Method 2: Enable Administrator Account
1. On the error screen press Shift + F10 to open Command Prompt.
2. Type the following command and hit Enter: MMC
3. Next click File > Add/Remove Snap-in.

4. Select Computer Management and then double-click on it.

5. In the new window that opens select Local computer and then click Finish followed by OK.

6. Then double-click Computer Management (Local) > System Tools > Local Users and Groups > Users > Administrator.
7. Make sure to Uncheck the “Account is disabled” option and click OK.

8. Next, right-click on the Administrator then select Set Password and set a strong password to get started.

9. Finally, close everything and restart your PC. After the restart, you may be able to Fix Windows Could Not Complete The Installation.
Method 3: Start Account Creation Wizard
1. Again open the Command Prompt on the error screen by pressing Shift + F10.
2. Type the following command and hit Enter: cd C:\windows\system32\oobe

3. Again type “msoobe” (without quotes) and hit Enter.
4. The above will start the user account creation wizard, so create a generic account and it’s password.
Note: Keep your product key ready as sometimes it is required. If it asks for OEM/No then simply hit finish.
5. Once done hit Finish and close everything. Restart your PC you may have successfully fix Windows Could Not Complete The Installation. To Install Windows On This Computer, Restart The Installation.
Method 4: Change Password Requirements
This error tends to pop-up when in Audit Mode and the computer has just been joined to a domain. The error is caused by password requirements added to the local security policy. This typically includes a minimum password length and password complexity.
1. Open the Command prompt on the error screen.
2. Type the following the command and hit Enter: secpol.msc
3. Navigate to Account Policies > Password Policy.

4. Now change “Minimum password length” to 0 and disable “Password must meet complexity requirements.“
5. Apply the changes and then exit the Security Policy console.
6. Click OK on the error message to reboot your PC.
Method 5: Registry Fix
1. On the same error screen press Shift + F10 to open Command Prompt.
2. Type the following command and hit Enter: regedit

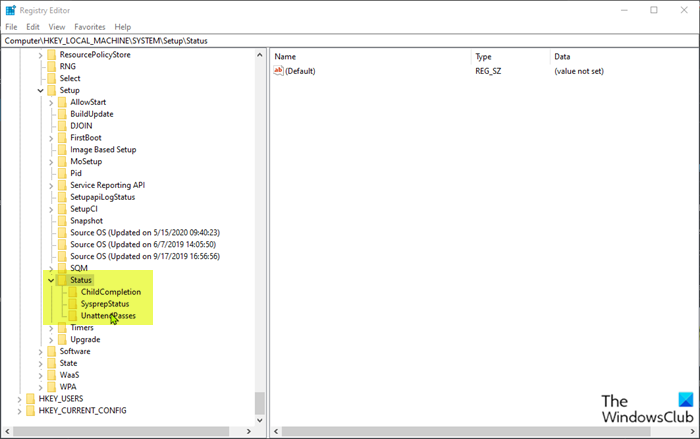
3. Now in the Registry Editor navigate to the following key: Computer\HKEY_LOCAL_MACHINE\SYSTEM\Setup\Status
4.Adjust the following values if they don’t match the following:
Note: To change the value of the below keys double click on them and then enter the new value.
HKEY_LOCAL_MACHINE\SYSTEM\Setup\Status\AuditBoot Value: 0
HKEY_LOCAL_MACHINE\SYSTEM\Setup\Status\ChildCompletion\setup.exe Value: 3
HKEY_LOCAL_MACHINE\SYSTEM\Setup\Status\ChildCompletion\audit.exe Value: 0
HKEY_LOCAL_MACHINE\SYSTEM\Setup\Status\SysprepStatus\CleanupState Value: 2
HKEY_LOCAL_MACHINE\SYSTEM\Setup\Status\SysprepStatus\GeneralizationState Value: 7
HKEY_LOCAL_MACHINE\SYSTEM\Setup\Status\UnattendPasses\auditSystem Value: 0

5. After a Reboot the Audit Mode is disabled and Windows starts regularly – in the Out of Box Experience mode.
Method 6: Disable Audit Mode
Running Sysprep command each time resets Windows licensing the state to default. So if your Windows is activated and you run this command, you’ll need to reactivate Windows after executing this command.
1. Open Command Prompt on the error screen.
2. Type the following command in the cmd and hit Enter: sysprep /oobe /generalize

3. This will disable the Audit Mode.
4. Close everything and reboot your PC normally.
5. If you’re still facing this issue then again open cmd.
6. Type the following command and hit Enter: regedit
7. Navigate to the following registry key:
HKEY_LOCAL_MACHINE\SOFTWARE\Microsoft\Windows\CurrentVersion\Setup\State
8. Highlight State Registry key, then right-click on ImageState in the right window pane and click on Delete.

9. Once you deleted the string, close everything and restart your PC.
Recommended for you:
That’s it you have successfully Fix Windows Could Not Complete The Installation Error but if you still have any queries regarding this guide then please feel free to ask them in the comment’s section.

Aditya Farrad
Aditya is a self-motivated information technology professional and has been a technology writer for the last 7 years. He covers Internet services, mobile, Windows, software, and How-to guides.
24 thoughts on “Fix Windows Could Not Complete The Installation [SOLVED]”
Every single solution you provide is on the basis that you can successfully invoke the shift + F10 command. Unfortunately for me it doesn’t work, so still stuck in an irritating reboot loop.
Same! So irritating… this is happening on a new Surface Laptop and unable to do the Shift + F10 no matter how I try…
If shift + F10 does not work and you are using a laptop, make sure you also press the function button (FN) (to activate F1-F12).
So press: shift + FN + F10 and it should work.
For some reason I can click on local users and groups on step 6 of method one. What do I do?
Windows could not complete the installation
If you’re encountering the error message Windows could not complete the installation on your Windows 10 computer, then this post is intended to help you. In this post, we will identify the possible causes, as well as provide the most appropriate solutions you can try to help you remediate this issue.
When you encounter this issue. you’ll receive the following full error message;
Windows could not complete the installation. To install Windows on this computer, restart the installation.

You can encounter this issue when a fresh Windows installation is interrupted before a user account is created. This error may also occur when upgrading from Windows 7/8.1 to Windows 10 or upgrading Windows 10 to a newer version/build. In some cases, you may encounter this issue when you try to reset Windows 10 as reported by some users.
However, this error essentially means you are using Audit Mode to install Windows which is the main cause of this error. When Windows boots for the very first time then either it can boot to OOBE or Audit Mode.
Windows could not complete the installation
Let’s take a look at the description of the process involved concerning each of the listed solutions.
1] Run Automatic Startup Repair
As you’re receiving the error message Windows could not complete the installation after/during updating/upgrading Windows 10, you can try running Automatic Startup Repair and see if the issue will be resolved.
2] Enable Administrator Account
You can now exit MMC console and restart your computer and see if the issue is resolved or not. If the latter is the case, continue with the next solution.
3] Start Account Creation Wizard
On boot, check if the Windows could not complete the installation issue is resolved. Else, proceed with the next solution.
4] Change Password Requirements
If you’re in Audit Mode and the computer has just been joined to a domain, you’ll receive the Windows could not complete the installation error. The error is caused by password requirements added to the local security policy. This typically includes a minimum password length and password complexity.
If the issue persists, try the next solution.
5] Modify some registry key values
In the registry editor windows that opens, navigate or jump to the registry key path below and on the right pane double-click on the following registry keys one after the other and modify the Value data field accordingly:
Audit: 0
setup.exe: 3
audit.exe: 0
CleanupState: 2
GeneralizationState: 7
auditSystem: 0
Once done, reboot your PC and the Audit Mode will be disabled and Windows 10 will start normally and boot into the Out of Box Experience mode.
6] Disable Audit Mode
Date: August 27, 2020 Tags: Installation
Related Posts
cFosSpeed Driver preventing Windows 11 installation
Fix Office Error Code 30010-4 during Installation or Upgrade
Errors 0-1011, 3088-1015, 30183-1011 or 0-1005 when installing Office
[email protected]
Obinna Onwusobalu, has studied Information & Communication Technology and is a keen follower of the Windows ecosystem. He runs a computer software clinic. He says it’s best practice to create a System Restore Point before making any changes to your PC.
[SOLVED] Windows 10 Could Not Complete the Installation + Guide [MiniTool Tips]
By Tina | Follow | Last Updated October 20, 2021
Summary :
Have you ever gotten stuck with the Windows installation error Windows could not complete the installation when updating your operating system? This post will give you 5 ways to solve the error when Windows 10 installation has failed. Just try them one by one to get rid of the issue to use PC properly, especially try MiniTool software.
Quick Navigation :
Phenomenon
Nowadays, more and more computer users say that they have been troubled by the following Windows 10 installation error “Windows could not complete the installation. To install Windows on this computer, restart the installation.” This error shows up when they want to boot their computer after updating the operating system.
However, they don’t know how to fix the issue when Windows could not complete the installation after updating to Windows 10, so they ask for help on the Internet.
If you have the same problem, you have come into the right place now because this article will give you five solutions to fix the issue when Windows creates this database of configuration settings during installation.
In particular, the fifth method is the most effective and reliable one.
Now, we will introduce the methods one by one to fix the Windows installation failure after update.
Quick Video Guide:
Case 1: Windows Could Not Complete the Installation
Fix#1. Using Automatic Repair
If you have received an error message that says Windows 10 could not complete the installation after updating your operating system, you can try using Automatic Repair to solve Windows 10 installation error.
Step 1: Start your PC. Just as Windows attempts to load, press the Power button to turn it off immediately. Do this operation two or three times.
Step 2: On the third time, you can see a message that says “Preparing Automatic Repair”, then you can click “Advanced options” to repair your PC.
Step 3: You need to click “Troubleshoot”> “Reset this PC”> “Keep my files”.
Step 4: You need to choose one account and input your password to continue.
Step 5: Next, you need to click «Cancel» button. Then click «Continue» button to exit and continue to Windows 10 Home.
After that, you can try to restart your computer and check whether the issue Windows cannot complete the installation has been fixed.
Fix#2. Enable Administrator Account
The second method of solving error “Windows could not complete the installation Windows 10 Shift 10 not working” is to enable administrator account. You can try using it to fix Windows 10 installation problem.
Step 1: On the error screen, you can press “Shift” key and “F10” key together to launch Command Prompt.
Step 2: Then, type the MMC command and hit “Enter” to continue.
Step 3: In the main interface, you need to click “File” and choose “Add/Remove Snap-in” to continue.

Step 4: In the following popup window, choose “Computer Management” and double-click it.
Step 5: In the next window, you need to check the “Local computer: (the computer this console is running on)” and click “Finish” to continue.

Step 6: Then click “OK” to continue to the next step.

Step 7: After returning to the main interface, you need to click “Computer Management (Local)”> “System Tools”> “Local Users and Groups”> “Users”> “Administrator” to continue.

Step 8: Then you can open the following interface by double-click “Administrator”. After that, you need to make sure that the option “Account is disabled” is unchecked. Then click “OK” to continue.

Step 9: Next, right-click “Administrator” and choose “Set Password”. You need to set a strong password to get started.

Step 10: All steps have been finished. Now, you can restart your computer and check whether the error Windows could not complete the installation Shift 10 not working is solved.
Fix#3. Change Password Requirement
If above solutions are not effectively to solving the error “Windows could not complete the installation”, you can try changing password to solve Windows 10 installation error.
Step 1: You still need to open the Command Prompt by pressing “Shift’ and “F10” keys together on the error screen.
Step 2: Then you can input the secpol.msc command and hit «Enter» to continue.
Step 3: After that, you will see a popup window. Thus, you need to unfold “Account Policy” and choose “Password Policy”.
Step 4: You can see “Minimum password length” on the right side. You need to right-click on it, choose «Properties», and change the “Security Setting” to 0 characters. Then apply it and click “OK” to continue.

Step 5: Make sure that the “Password must meet complexity requirements” is disabled by right-clicking it, choosing “Properties” and apply it. Then click “OK” to continue.

Step 6: Then reboot your computer to check whether the Windows 10 installation failure is solved.
Fix#4. Run Account Creation Wizard
Now, we will introduce the fourth method to solve “Windows could not complete the installation Windows 10”. Of course, if the above methods are not working, you can try to use this one.
Step 1: You need to press “Shift” key and “F10” key together on the error screen to launch the Command Prompt.
Step 2: Then type the following command and hit “Enter” to continue.
CD C:\windows\system32\oobe
Step 3: Then input msoobe command and hit “Enter” to continue.
Step 4: Then you will see a popup window. You need to make a generic account and password. On this popup window, then click ‘Finish” button to finish the process.
Step 5: Now, you can reboot your computer and check whether the error “Windows could not complete the installation. To install Windows on this computer, restart the installation.” is solved.
Fix#5. Restore to Different Computer
If none of above methods work, you can use the fifth solution which is to restore to different computer. As a matter of fact, this solution is effective and thousands of users have successfully solved the problem by using it.
Now, we will introduce how to restore to different computer step by step with pictures.
To restore to different computer, you need the help of a piece of third-party software. Fortunately, MiniTool Software Limited can provide you with such a kind of software, which is MiniTool ShadowMaker.
The Windows 10 backup software – MiniTool ShadowMaker has been the first choice of thousands of computer users, because it is a type of professional backup software that provides various backup services with its multiple functions, such as files backup, system backup, disk backup and so on.
Besides backup feature, it even can help you to clone hard drive and clone OS from HDD to SSD.
Before introducing how to restore to different computer, you can download MiniTool ShadowMaker Trial which can be used for 30 days without any fees from the following button or purchase an advanced one.
After you have successfully installed the free backup software, you can try restoring to different computer based on following instructions.
The precondition of restoring to different computer is that you have created a system image on a normal computer in advance by using MiniTool ShadowMaker.
Therefore, in order to solve Windows 10 installation problem, you need to install and run MiniTool ShadowMaker Trial on a normal computer and create a system image on it since your computer can’t boot due to the error “Windows could not complete the installation Windows 10”.
Thus, the following article is useful for you to create a system image.
In addition, a bootable media is necessary since your computer can’t boot normally. As a matter of fact, you can use MiniTool ShadowMaker Trial to create it.
Therefore, you need to know how to create the bootable media and how to boot your computer from it. You can take the following two articles as a reference.
Then we will show you how to solve the error of Windows 10 installation has failed through restoring to different computer step by step.
Step 1: Connect the hard drive to your computer and enter MiniTool Recovery Environment. Go to the Restore interface and click “Add Backup” to add system image to the backup list. Then choose it and click “Restore” to continue.

Step 2: In the popup window, you need to choose the backup version and click “Next” to continue.


Step 4: You need to choose a target disk and click “Next” to continue.


How to keep data safe? How to back up files on windows 10? This post will introduce 4 ways to back up files with ease.
Step 5: The free backup software will begin the restoration process, so you need to wait patiently.
Step 6: After the restoration process is finished, you may find your computer still can’t boot normally. The reason is that the operating system is incompatible with your computer. Thus you need to boot your computer from the bootable media and go to “Tools” to choose “Universal Restore” to fix this problem.

Step 7: Then this free backup software can automatically list the operating system on the left pane and you need to click “RESTORE” button to continue.

Step 8: After a while, the restore process should be completed. Then you can exit MiniTool Recovery Environment and set your computer to boot from hard drive. Then you can check whether your computer can boot successfully.
Case 2: Windows 10 Installation Has Failed
When installing the operating system, you may come across the error Windows 10 installation has failed. This error may occur in the middle of the installation.
So, in the following section, we will show you how to fix the error that Windows 10 installation has failed.
Fix 1. Check Whether Your Computer Meets the Minimum Requirements
In order to install Windows 10 on your computer, you need to check whether your computer meets the minimum requirement. So, you need to check the following parameters.
If your computer cannot meet the above requirements, you may come across the error that Windows 10 installation has failed.
Fix 2. Clear Certain Attributes of the Installation Folder
Now, here is the tutorial.
When it is finished, check whether the error that Windows 10 installation has failed is fixed.
Fix 3. Rebuild BCD
In order to fix the error that Windows 10 installation has failed, you may try rebuilding BCD. To rebuild BCD, you can read the post: Step-by-Step Guide to Repair and Fix MBR Windows 7/8/8.1/10 to learn some more detailed solutions.
Fix 4. Run the Installation in Clean Boot
If you come across the error Windows 10 installation has failed, you can choose to install Windows 10 in Clean Boot.
Now, here is the tutorial.
After that, check whether the error that Windows 10 installation has failed is solved.
Bottom Line
In conclusion, we have introduced five ways to solve Window 10 installation issue “Windows could not complete the installation. To install Windows on this computer, restart the installation.” There is no doubt that each method has its advantage. We think the fifth way to solve Windows installation issue is more effective and more reliable.
ABOUT THE AUTHOR

Position: Columnist
Tina is a technology enthusiast and joined MiniTool in 2018. As an editor of MiniTool, she is keeping on sharing computer tips and providing reliable solutions, especially specializing in Windows and files backup and restore. Besides, she is expanding her knowledge and skills in data recovery, disk space optimizations, etc.
On her spare time, Tina likes to watch movies, go shopping or chat with friends and enjoy her life.